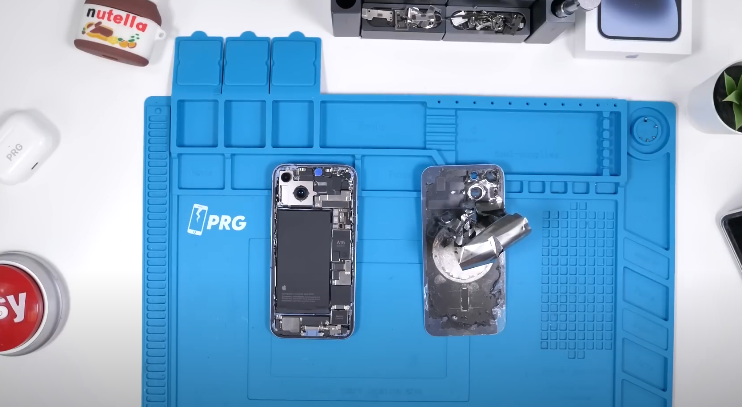
In this article, we take you on a journey of customization and innovation as we transform an iPhone 14 into a unique piece of tech art—a device with a transparent back glass. If you missed the previous video, here’s a quick recap: our goal is to make the iPhone’s back glass completely transparent. While the idea seems straightforward, the process is anything but.
The Challenges of Removing the Back Glass
From the outset, we encountered unexpected hurdles. The metal shield glued to the back glass posed our first major challenge. Apple’s adhesive proved to be among the toughest we’ve ever dealt with. After painstakingly removing it, we faced yet another issue: the camera bumps were welded directly to the metal plate. To proceed, we had to carefully use a Dremel to grind down the metal plate—an operation fraught with risks, including potential glass cracks.
Risky Business: Dremeling the Metal Plate
Using a small Dremel for precision, we began the meticulous task of removing the metal plate. Despite our best efforts, we caused a tiny crack on one of the camera lenses. Thankfully, the damage was minimal and unlikely to spread. This setback didn’t deter us; instead, it fueled our determination to be among the first to achieve this unique customization.
Preparing for Paint Removal
After addressing the metal plate, we turned our attention to removing the wireless charging components and MagSafe magnets. Using heat to loosen the adhesive, we carefully detached these components without causing further damage. With the back glass stripped down, it was time to tackle the painstaking task of scraping off the factory paint.
Scraping Off the Paint
Armed with a razor blade, we began the labor-intensive process of removing the paint from the back glass.
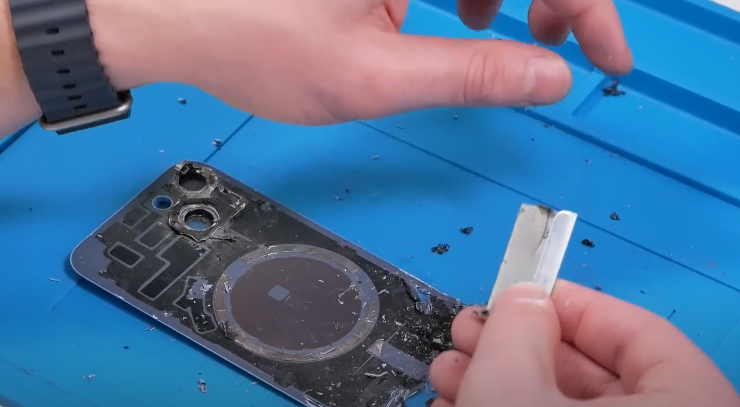
This phase was time-consuming and physically taxing, but persistence paid off. Leaving some paint around the camera area (due to the difficulty of accessing it), we finally revealed the clear glass we had envisioned.
Reassembly and Soldering Repairs
With the back glass cleared, it was time to reassemble the components. During inspection, we discovered a torn copper wire in the wireless charger. A quick soldering job fixed the issue, ensuring that the functionality remained intact. After cleaning the camera glass with precision and care, we reinstalled the wireless charger and MagSafe components.
Testing the Transparent iPhone 14
Once reassembled, the moment of truth arrived: testing the functionality of the wireless charger. Success! The device charged perfectly, confirming that our makeshift soldering job had worked.
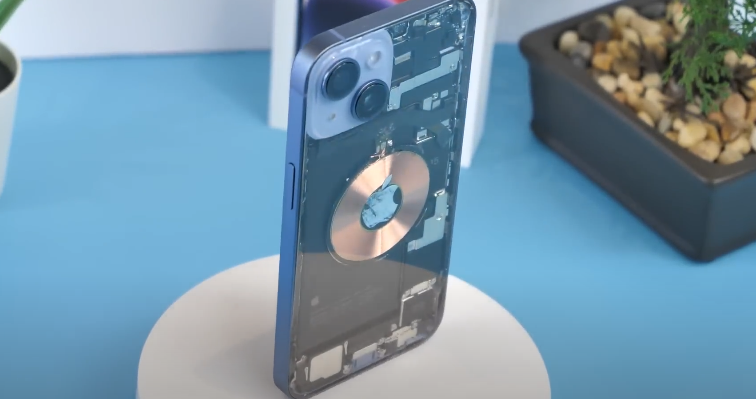
The final result? A stunning, transparent iPhone 14 that showcases the device’s intricate internal components.
A Unique Design for Tech Enthusiasts
The transparent back reveals the iPhone’s well-organized interior, including the Taptic Engine, loudspeaker, battery, and Apple’s A15 chip. This modification is perfect for tech lovers and guaranteed to spark conversations. Despite some sacrifices in aesthetics to maintain functionality, the result is nothing short of remarkable.
